 |
March 2011 (-33.830 deg., 151.146 deg.) Fig Tree Bridge Sydney's Seven Bridges Walk includes the Harbour Bridge, the Pyrmont Bridge, the ANZAC Bridge, the Iron Cove Bridge, the Gladesville Bridge, the Tarban Creek Bridge, and the Fig Tree Bridge, which carries Burns Bay Road over the Lane Cove River. The Fig Tree Bridge was built in 1963 and replaced a 19th century movable bridge with the same name. The new bridge has a seven span steel girder superstructure and reinforced concrete two column bents (with extra wide bent caps for an expressway that was never built). Despite only carrying a road, this bridge often provides a faster way in and out of Sydney than going the other way around over the Harbour Bridge.  Australia's Bridges: Fig Tree Bridge in New South Wales by Mark Yashinsky is licensed under a Creative Commons Attribution-NonCommercial-NoDerivs 3.0 Unported License. |
Thursday, March 31, 2011
Australia's Bridges: Fig Tree Bridge in New South Wales
Wednesday, March 30, 2011
Australia's Bridges: Pyrmont Bridge in Sydney, Australia (3)
 |
| March 2011 (-33.871 deg., 151.201 deg.) Pyrmont Bridge The quarter mile long Pyrmont Bridge is like a giant piece of furniture set in the middle of Darling Harbour. The area is so neat and clean that people feel comfortable lounging on and under the bridge. Darling Harbour is a big tourist area with many museums, parks, and promenades. The Pyrmont Bridge was converted to a pedestrian only bridge in the 1980s to allow people to stroll over and under it without worrying about traffic. |

Australia's Bridges: Pyrmont Bridge in Sydney, Australia (3) by Mark Yashinsky is licensed under a Creative Commons Attribution-NonCommercial-ShareAlike 3.0 United States License.
Tuesday, March 29, 2011
Australia's Bridges: Sydney Harbour Bridge (3)
 |
| March 2011 (-33.852 deg., 151.211 deg.) Sydney Harbour Bridge I wanted to show how the top chord of the arch on the Sydney Harbour Bridge is disconnected. This view is looking west from the Sydney Opera House. The bridge is very similar (and most likely a copy) of the Hell Gate Bridge across the East River in New York City. However, the Hell Gate Bridge was built in 1916 and is 1017 ft long while the Harbour Bridge was completed in 1932 and it's arch is 1650 ft long. |
Australia's Bridges: Sydney Harbour Bridge (3) by Mark Yashinsky is licensed under a Creative Commons Attribution-NonCommercial-NoDerivs 3.0 Unported License.
Monday, March 28, 2011
Australia's Bridges: Brickpit Ring Bridge in Sydney's Olympic Park (2)
 |
| March 2011 (-33.840 deg., 151.072 deg.) Brickpit Ring Bridge The Brickpit Ring Bridge is supported by 'X' shaped piers and cables for additional stability. A ring connects the substructure to the superstructure elements. The superstructure includes cross-braces, more cables, a steel deck, and panels to protect visitors from the elements. A bridge in the shape of a ring is unusual and stretches the limits of what is a bridge. I recall that the Happy Pontist mentioned a similar bridge that carries visitors over the plants in Kew Gardens. |
Australia's Bridges: Brickpit Ring Bridge in Sydney's Olympic Park (2) by Mark Yashinsky is licensed under a Creative Commons Attribution-NonCommercial-ShareAlike 3.0 United States License.
Sunday, March 27, 2011
Australia's Bridges: Brickpit Ring Bridge in Sydney's Olympic Park (1)
 |
| March 2011 (-33.840 deg., 151.072 deg.) Brickpit Ring Bridge When I asked The Happy Pontist which bridges to visit in Australia, one of his suggestions was the Brickpit Ring Bridge in Sydney's Olympic Park. Southeast Australia is composed of layers of shale (decomposed organic material) and sandstone (alluvial sediments) that make striking landscapes where they are uplifted and exposed in canyons (like in the Blue Mountains). Part of Olympic Park was a quarry where this material was once used to make bricks for building much of Sydney. Before the 2000 Olympics, the organizers turned the quarry into a scenic wetland and built a circular bridge so visitors could walk around it without disturbing it's fragile ecology. The bridge is a simple structure composed of steel elements and cables. We'll take a closer look at it tomorrow. The picture above is actually six photos that Photoshop's Automator turned into a panorama of the entire bridge. |
Australia's Bridges: Brickpit Ring Bridge in Sydney's Olympic Park (1) by Mark Yashinsky is licensed under a Creative Commons Attribution-NonCommercial-ShareAlike 3.0 United States License.
Saturday, March 26, 2011
Australia's Bridges: Pyrmont Bridge in Sydney (2)
 |
| March 2011 (-33.871 deg., 151.201 deg.) Pyrmont Bridge (2) A view from the deck of the Pyrmont Bridge. The bridge supports a monorail with a specially designed column on the swing span that allows the Pyrmont Bridge to open while continuing to support the monorail. |
Australia's Bridges: Pyrmont Bridge in Sydney (2) by Mark Yashinsky is licensed under a Creative Commons Attribution-NonCommercial-ShareAlike 3.0 United States License.
Friday, March 25, 2011
Australia's Bridges: Glebe Island Bridge in New South Wales
 |
| March 2011 (-33.868 deg., 151.186 deg.) Glebe Island Bridge We'll temporarily leave the Pyrmont Bridge to show a similar swing bridge a few miles away in Rozelle Bay. I often refer to a text when I write my blog. For Australian bridges, I'm using 'Spanning Two Centuries: Historic Bridges of Australia,' by Colin O'Connor. He mentioned that the Glebe bridge was built one year earlier than the Pyrmont Bridge (in 1901), it uses a similar electric powered swing mechanism, but it's a smaller structure (with two 29.1 steel truss swing spans). I previously mentioned that the Glebe Island Bridge was made superfluous by the enormous ANZAC Bridge immediately to the south. The Glebe Island Bridge remains in the closed position to allow ships to pass, but it may occasionally open on special occasions. Swing Bridges are disliked by coastal and navigation agencies because the swing mechanism blocks the middle of the channel. In the United States, they are removed at an alarming rate to allow larger ships through US waters. |
Australia's Bridges: Glebe Island Bridge, Rozelle Bay by Mark Yashinsky is licensed under a Creative Commons Attribution-NonCommercial-ShareAlike 3.0 United States License.
Thursday, March 24, 2011
Australia's Bridges: Pyrmont Bridge in Sydney, (1)
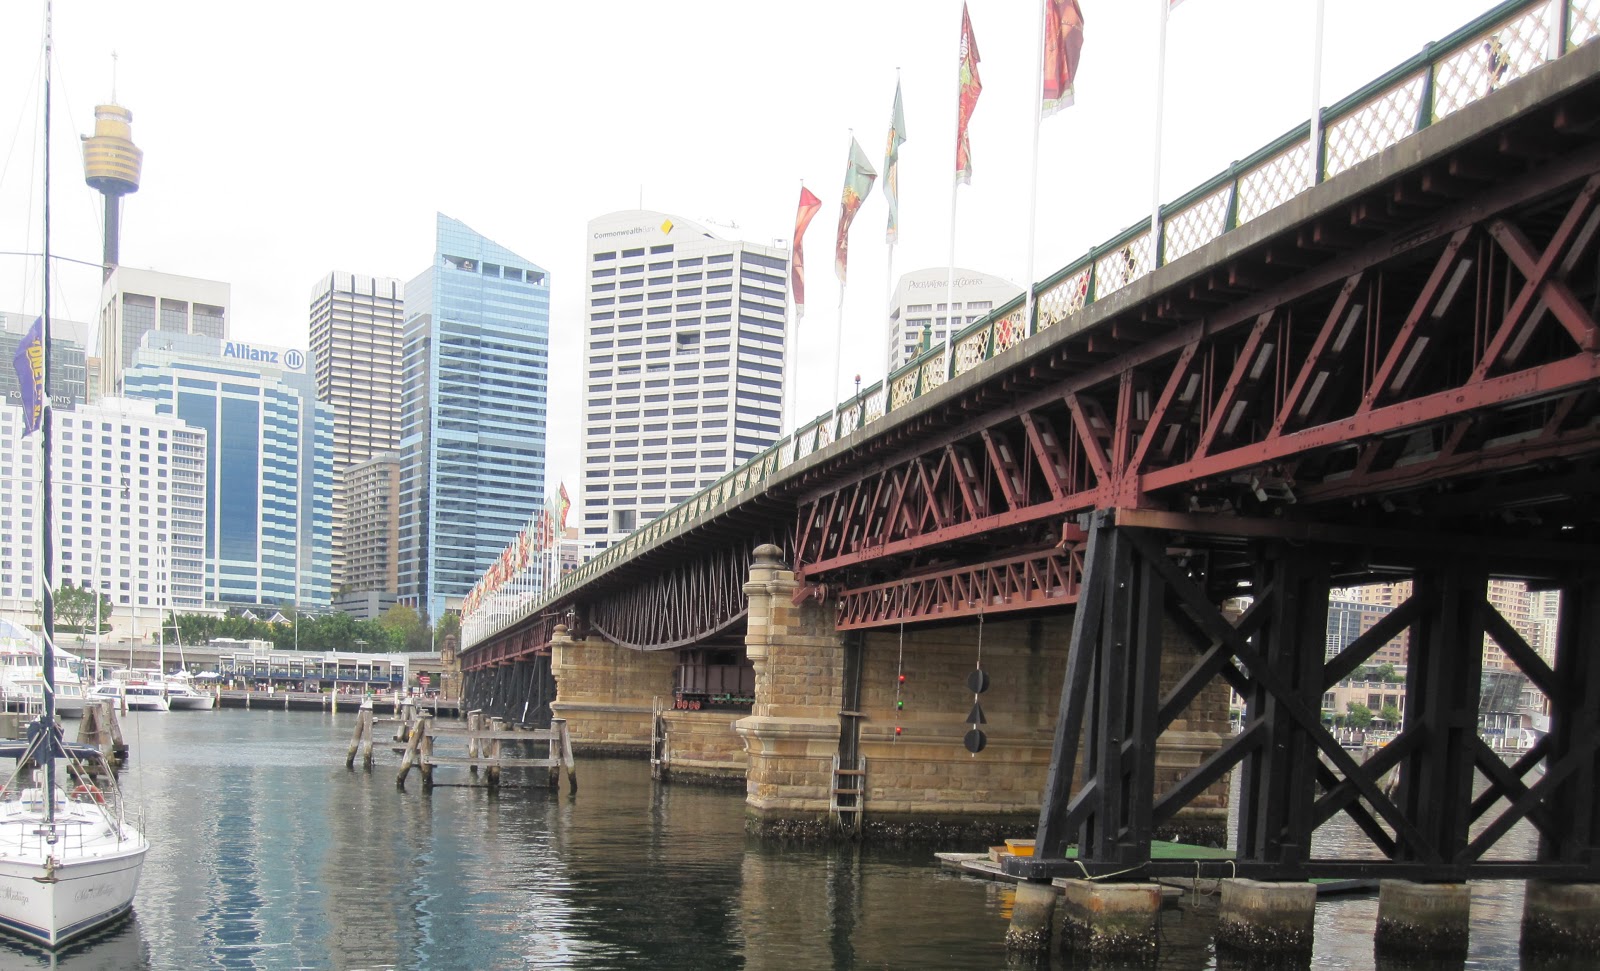 |
| March 2011 (-33.871 deg., 151.201 deg.) Pyrmont Bridge (1) The 'Seven Bridges Walk' begins with the Pyrmont Bridge across Sydney's Darling Harbour. It is a long pedestrian bridge (completed in 1902) that includes timber trestle spans and two 34 m long swing spans. It uses nicely carved stone at the ends of the bridge and for the swing span. This stone must have been readily available because I've seen it on most of the older bridges around Sydney. |
Australia's Bridges: Pyrmont Bridge in Sydney (1) by Mark Yashinsky is licensed under a Creative Commons Attribution-NonCommercial-ShareAlike 3.0 United States License.
Wednesday, March 23, 2011
Australia's Bridges: Sydney Harbour Bridge (2)
 |
| March 2011 (-33.852 deg., 151.211 deg.) Sydney Harbour Bridge (2) I think it was the Happy Pontist who complained about the absurdity of being charged several hundred dollars for the privilege of climbing to the top of the Sydney Harbor Bridge. For those of us who are paid to design and inspect bridges, having to pay to climb one seems strange. Perhaps the Tall Bridge Guy would appreciate it since he talked about creating an encyclopedia of good bridge details. Since I'm more interested in taking bridge photos at some distance, I had no problem in refusing to pay. Fortunately, no one charged me to walk under the bridge approach spans. |
Australia's Bridges: Sydney Harbour Bridge (2) by Mark Yashinsky is licensed under a Creative Commons Attribution-NonCommercial-NoDerivs 3.0 Unported License.
Tuesday, March 22, 2011
Australia's Bridges: Sydney Harbour Bridge (1)
 |
| March 2011 (-33.852 deg., 151.211 deg.) Sydney Harbour Bridge (1) The most famous bridge in Australia is the Sydney Harbour Bridge. I guess if you put a couple of iconic structures (the bridge and the opera house) in your city, it can become a tourist destination. The nice thing about the Harbour Bridge is that it is really huge (the arch is 456 ft tall and 1650 ft long). You can see it from miles away and it suddenly pops up when you least expect it. Sydney is like a book of prints by Hokusai, only with the Harbour Bridge replacing Mt Fuji. The thing that bothers me is that arches are supposed to be in compression but I'm not sure what the top chord of this bridge is resisting. It stops abruptly without a clear load path! |
Australia's Bridges: Sydney Harbour Bridge (1) by Mark Yashinsky is licensed under a Creative Commons Attribution-NonCommercial-NoDerivs 3.0 Unported License.
Monday, March 21, 2011
Australia's Bridges: Iron Cove Bridge in New South Wales (2)
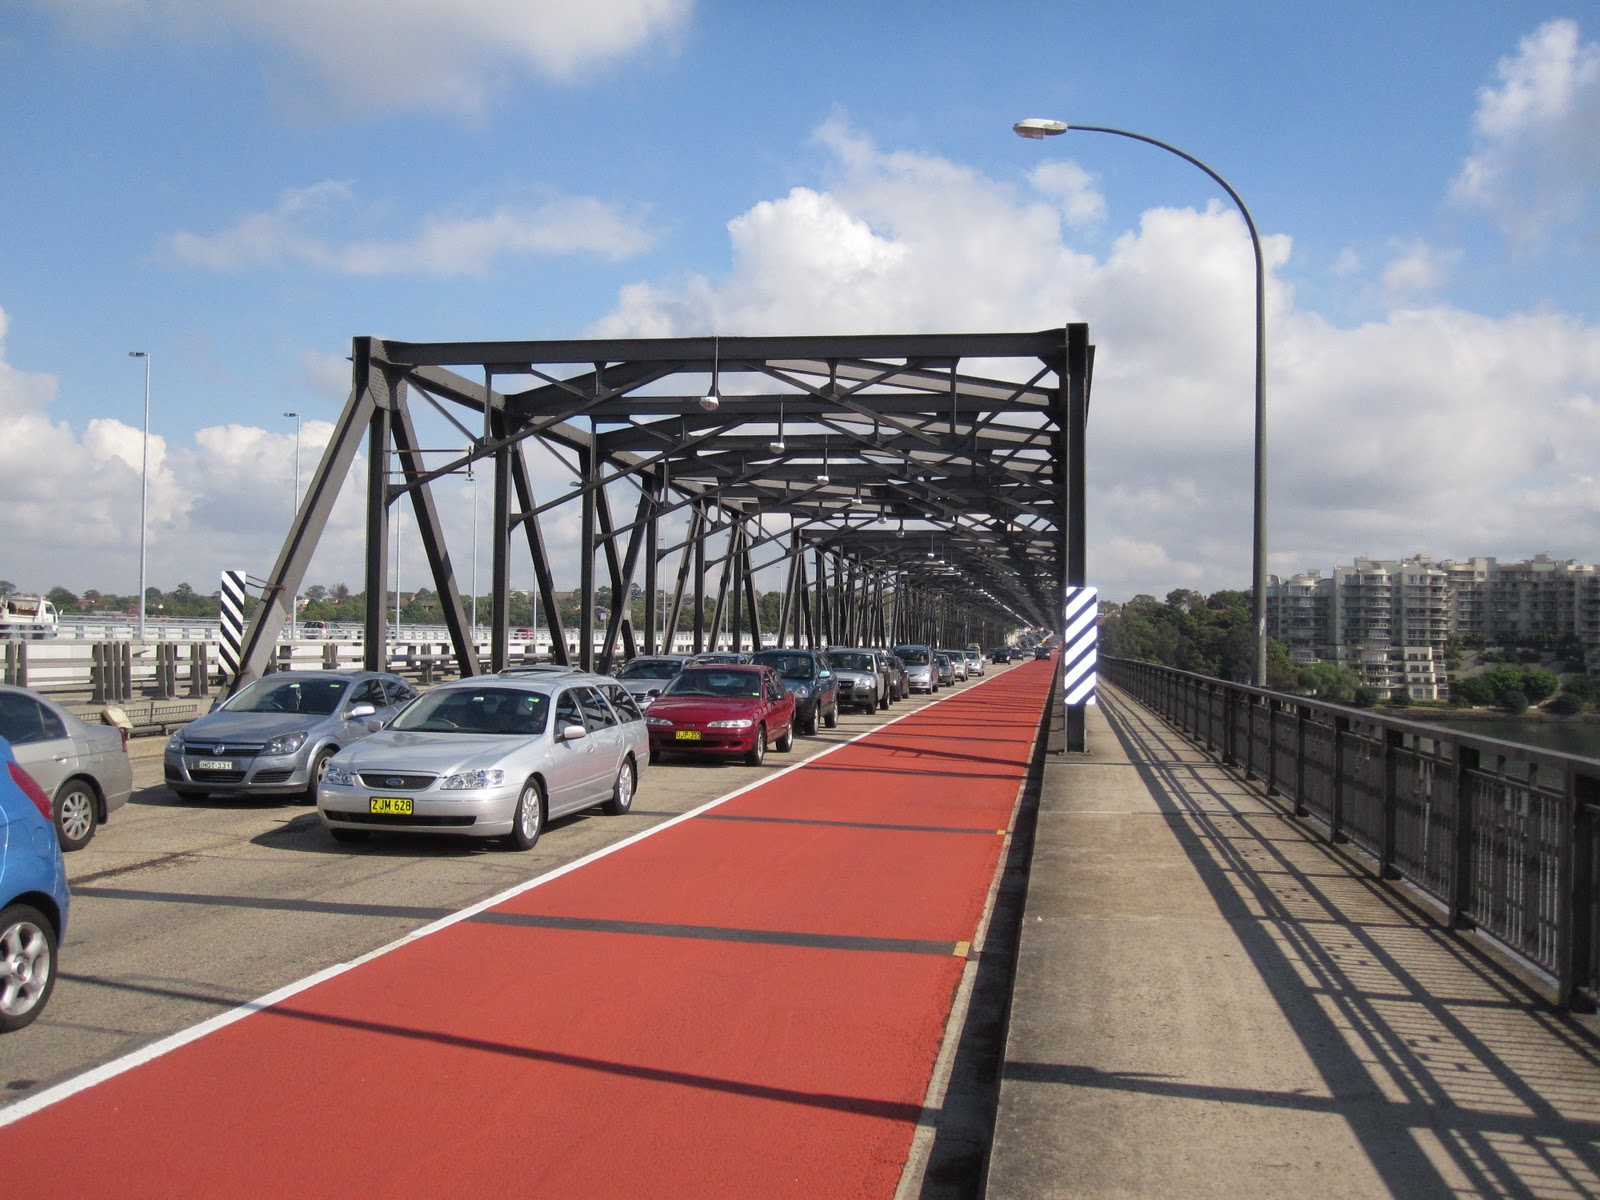 |
| March 2011 (-33.859 deg., 151.162 deg.) Iron Cove Bridge (2) A look from the deck of the Iron Cove Bridge. I like the red lane, which is designated for buses and emergency vehicles. The portal frame is less ornate than the bridge columns. There's still lots of traffic, even with the addition of a second bridge. |
Australia's Bridges: Iron Cove Bridge in New South Wales (2) by Mark Yashinsky is licensed under a Creative Commons Attribution-NonCommercial-NoDerivs 3.0 Unported License.
Sunday, March 20, 2011
Australia's Bridges: Iron Cove Bridge in New South Wales (1)
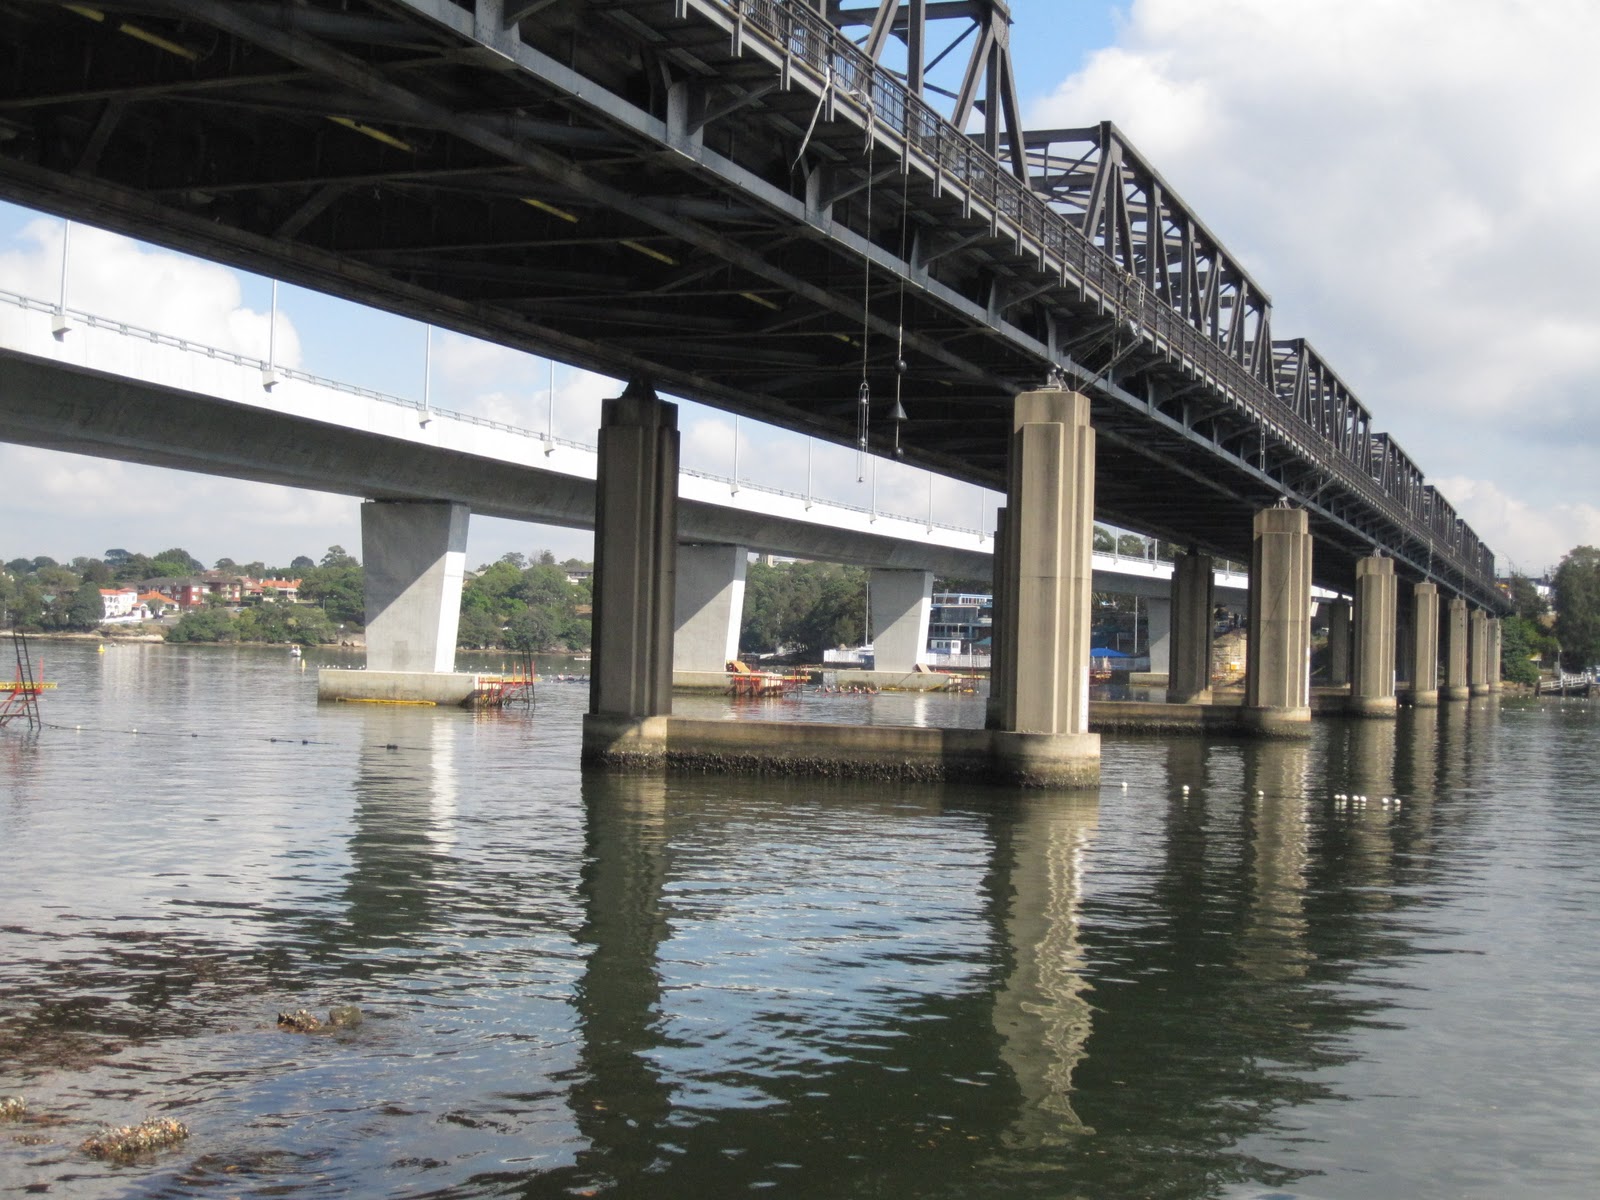 |
| March 2011 (-33.859 deg., 151.162 deg.) Iron Cove Bridge (1) The Iron Cove Bridge is on Route 40 between the ANZAC Bridge (to the south) and the Gladesville Bridge (to the north). Planning for the bridge began soon after WWII but the bridge wasn't completed until 1955. It's a series of short through truss spans on ornate, two column bents. A few years ago (despite opposition from local residents) the government built a parallel structure (to increase traffic capacity) that didn't match the architecture of it's neighbor. Perhaps that's why only the older structure is shown on most websites. |
Australia's Bridges: Iron Cove Bridge in North South Wales (1) by Mark Yashinsky is licensed under a Creative Commons Attribution-NonCommercial-NoDerivs 3.0 Unported License.
Saturday, March 19, 2011
Australia's Bridges: Tarban Creek Bridge in New South Wales (2)
 |
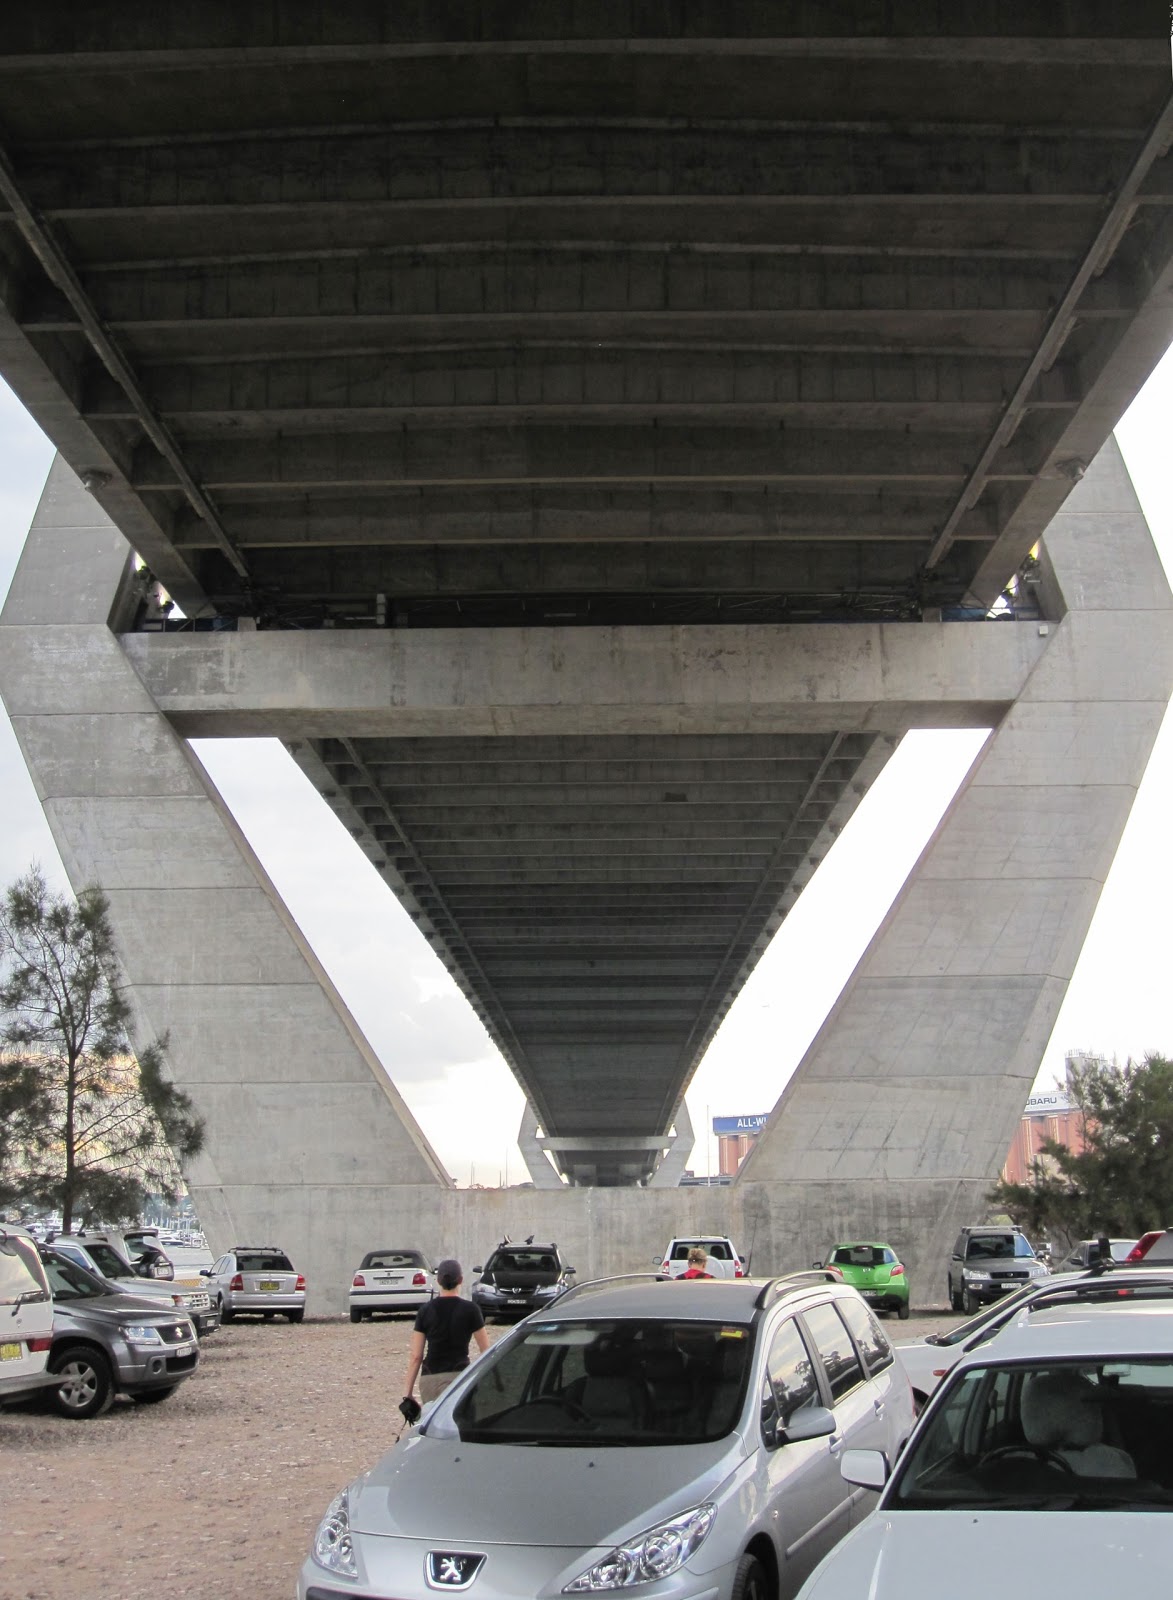
| March 2011 (-33.839 deg., 151.146 deg.) Tarban Creek Bridge |
Between the Gladesville Bridge and the Tarban Creek Bridge is this connector ramp with attractively shaped pier walls. I also like the long overhangs on the superstructure. I think even the she-bolt holes in the piers add to this connector's appearance.
Australia's Bridges: Tarban Creek Bridge in New South Wales (2) by Mark Yashinsky is licensed under a Creative Commons Attribution-NonCommercial-NoDerivs 3.0 Unported License
Friday, March 18, 2011
Australia's Bridges: Tarban Creek Bridge in New South Wales (1)
 |
| March 2011 (-33.837 deg., 151.145 deg.) Tarban Creek Bridge The Tarban Creek Bridge is a reinforced concrete multi-span bridge with what I would call a deck-stiffened arch over the creek. It was built about the same time as the Gladesville Bridge (to the south) and the Fig Tree Bridge (to the north) for an expressway project that never came to fruition. I think it's a little disingenuous that they advertise a 'Seven Bridges Walk' when tall fences surround one of the bridges (I took this photo through one of the fence links). |
Australia's Bridges: Tarban Creek Bridge in New South Wales (1) by Mark Yashinsky is licensed under a Creative Commons Attribution-NonCommercial-NoDerivs 3.0 Unported License.
Thursday, March 17, 2011
Australia's Bridges: Gladesville Bridge in New South Wales (2)
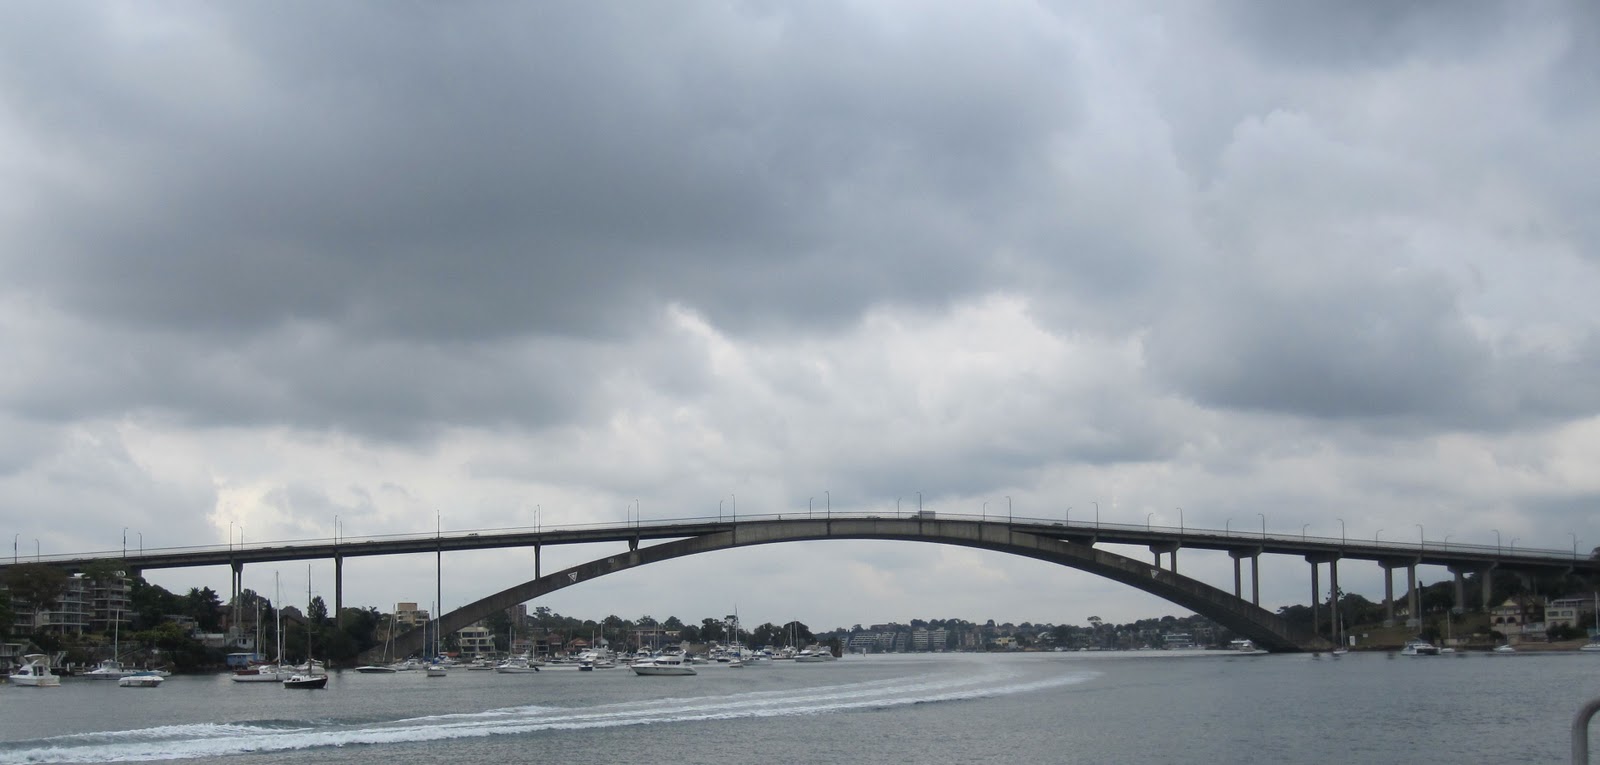 |
| March 2011 (-33.840 deg., 151.147 deg.) Gladesville Bridge over the Parramatta River Before I took the 'Seven Bridges Walk,' I took a ferry to photograph the bridges that cross the Parramatta River. Australia's weather is funny, with quick vicious storms that last about two minutes. I got hit by several of them standing on the deck of the ferry and photographing bridges. The Gladesville Bridge was the longest single span arch when it was built in 1964. Its still an amazing looking bridge. With an arch length of about 1000 ft, a vertical clearance of 135 ft, and a height to depth of only 0.14, it's still a lot taller than it needs to be for the size of the ships that travel the Parramatta. The longest concrete arch bridges are now several hundred feet longer than the Gladesville Bridge but they are much taller and less graceful. This bridge was extremely innovative, with precast arch segments supported by timber falsework while it was put together. |
Australia's Bridges: Gladesville Bridge in New South Wales (2) by Mark Yashinsky is licensed under a Creative Commons Attribution-NonCommercial-NoDerivs 3.0 Unported License.Publish Post
Wednesday, March 16, 2011
Australia's Bridges: Gladesville Bridge in New South Wales (1)
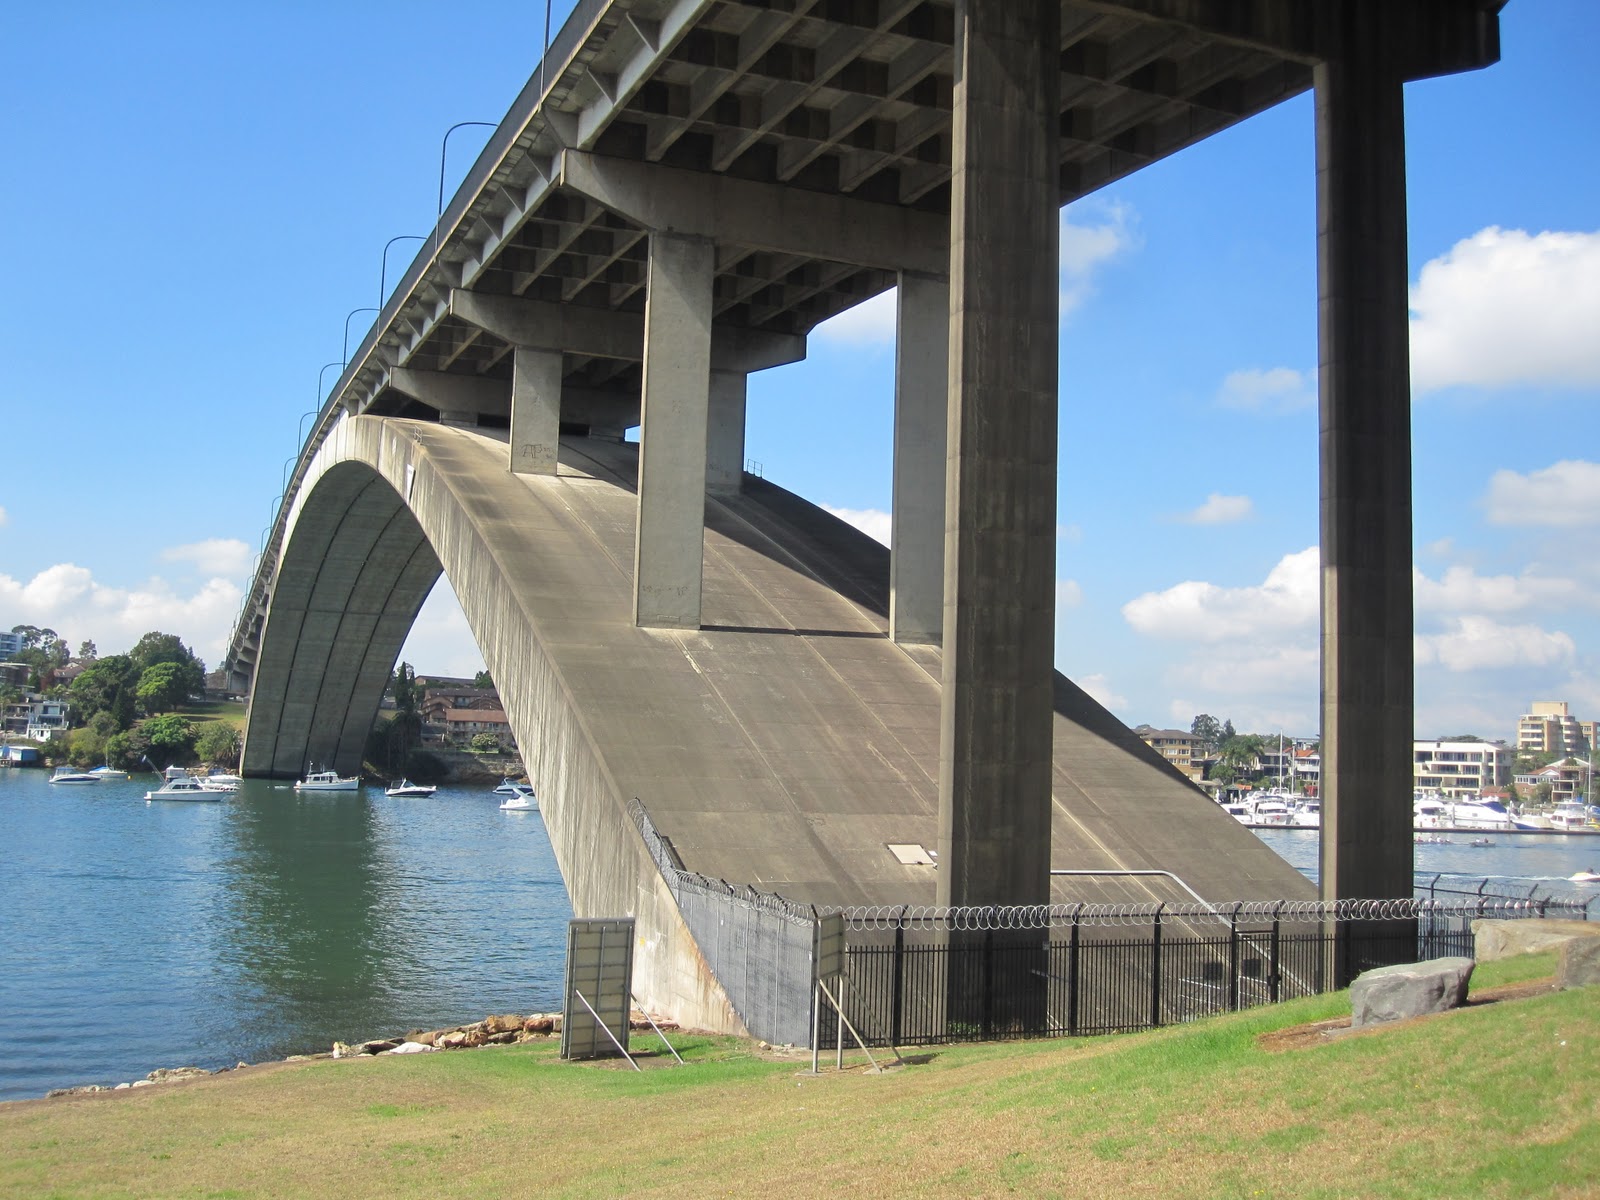 |
| March 2011 (-33.840 deg., 151.147 deg.) Gladesville Bridge over the Parramatta River Dear Reader. I'm sorry I was unable to provide a bridge photo for the last few of days, but I was unable to find an internet connection. I am now at a Starbucks in Brisbane and able once again to write my blog. While I was in Sydney, I went on the 'Seven Bridges Walk.' After crossing the ANZAC Cable-Stayed Bridge, I passed a couple of ordinary looking bridges until I came to the Parramatta River and the beautiful Gladesville Bridge. The Gladesville Bridge is 1000 ft long and 135 ft high at the top of the arch. We'll take another look at this handsome concrete deck arch tomorrow. |
Australia's Bridges: Gladesville Bridge in New South Wales (1) by Mark Yashinsky is licensed under a Creative Commons Attribution-NonCommercial-NoDerivs 3.0 Unported License.
Sunday, March 13, 2011
Australia's Bridges: ANZAC Cable-Stayed Bridge (4) in Sydney
 |
| March 2011 (-33.869 deg., 151.186 deg.) Bridge over Johnstons Bay I usually prefer landscape views, but for some reason, I'm providing several portrait views of the ANZAC Bridge. Also, I'm not sure how fond I am of 'Delta' or 'A' shaped towers. One advantage is they provide a consistent shape from the bottom to the top of the tower. Today, it seems like a central tower with a deck on each side is preferred, but I think they are less stable for earthquake loads. At least that's one problem that Australian engineers don't have to worry about. |
Australia's Bridges: ANZAC Cable-Stayed Bridge (4) in Sydney by Mark Yashinsky is licensed under a Creative Commons Attribution-NonCommercial-NoDerivs 3.0 Unported License.
Saturday, March 12, 2011
Australia's Bridges: Anzac Cable-Stayed Bridge (3) in Sydney
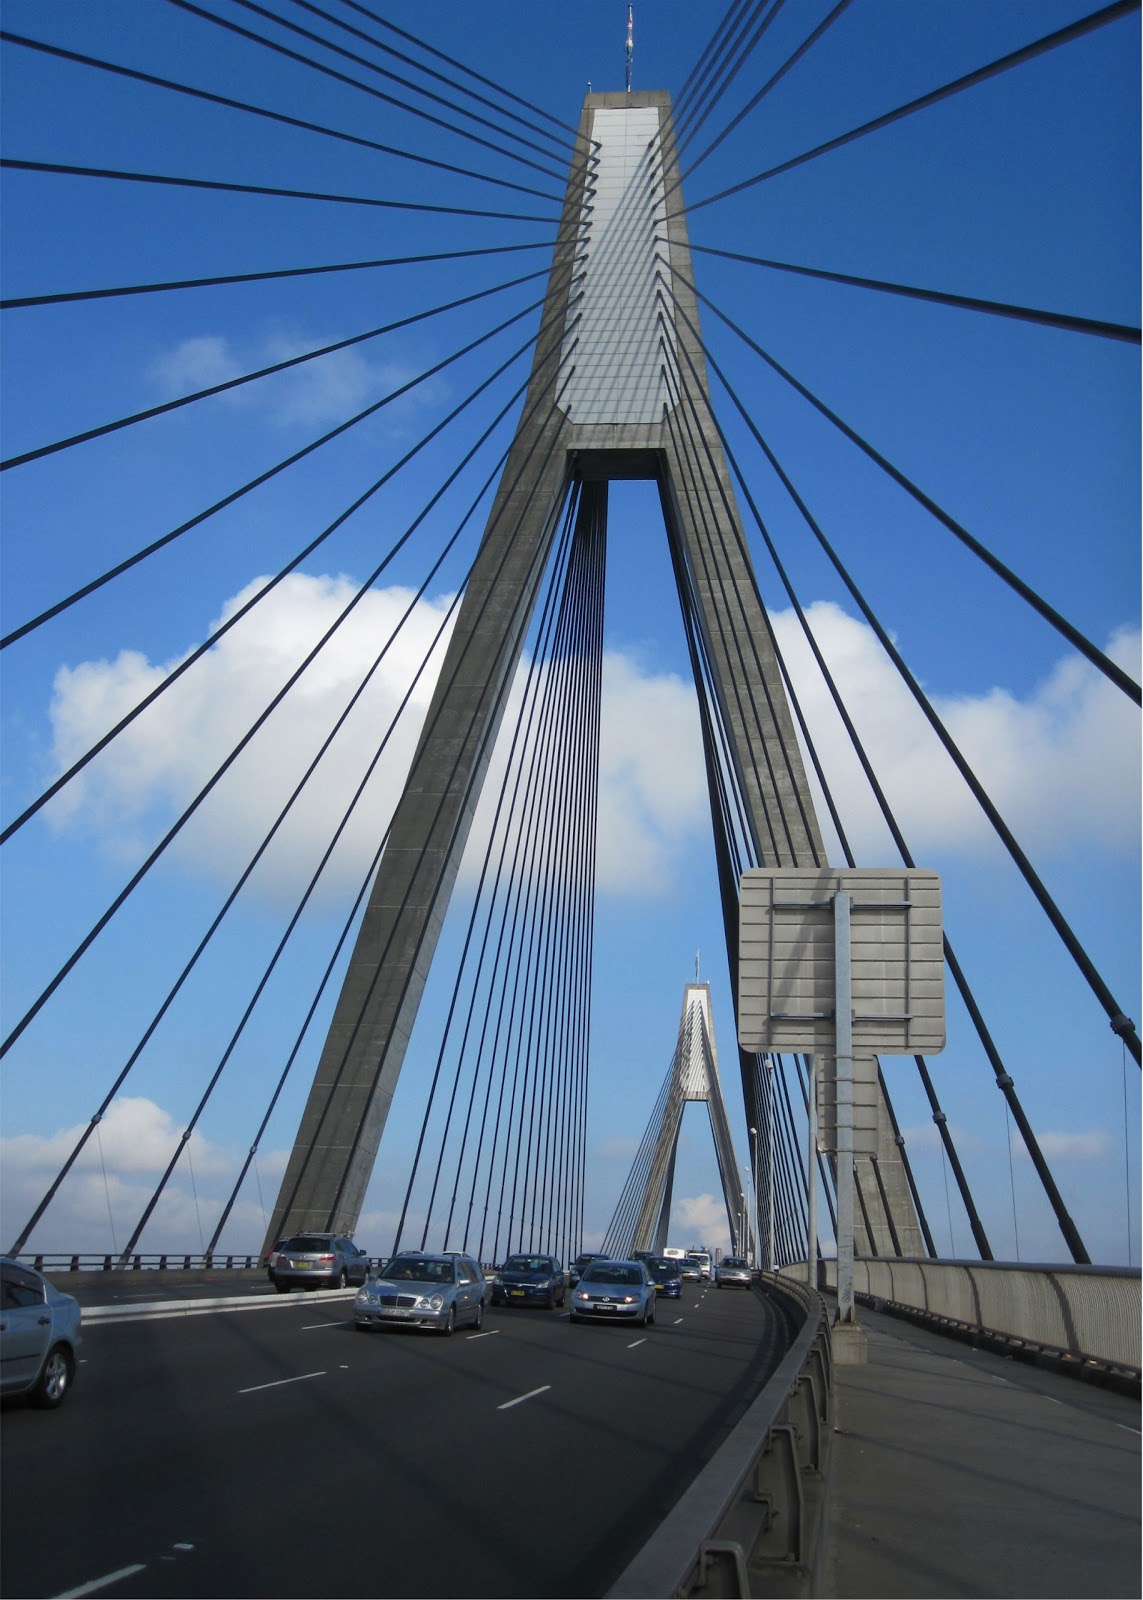 |
| March 2011 (-33.869 deg., 151.186 deg.) ANZAC Bridge over Johnstons Bay in Sydney, Australia The ANZAC Bridge has the longest main span (1132 ft) of any cable-stayed bridge in Australia. It was built extra tall and extra long to allow ships into tiny Johnstons Bay. However, the Bay is now used only for pleasure craft. The towers are topped with the flags of Australia and New Zealand and a statue of a soldier from each country stands 'at rest' at each end of the bridge. On the north side is a swing bridge (built in 1903) which is almost always in the closed position after it was replaced by the ANZAC Bridge (I'm not sure if the mechanism still works). |
Australia's Bridges: Anzac Cable-Stayed Bridge (3) in Sydney by Mark Yashinsky is licensed under a Creative Commons Attribution-NonCommercial-NoDerivs 3.0 Unported License.
Friday, March 11, 2011
Australia's Bridges: Anzac Cable-Stayed Bridge (2) in Sydney

The ANZAC Bridge has a steep ramp that carries runners and cyclists onto the side span. I think the runners enjoy the 'burn' but they are constantly at risk from the furiously pedaling cyclists.
Australia's Bridges: Anzac Cable-Stayed Bridge (2) in Sydney by Mark Yashinsky is licensed under a Creative Commons Attribution-NonCommercial-NoDerivs 3.0 Unported License.
Thursday, March 10, 2011
Australia's Bridges: ANZAC Cable-Stayed Bridge in Sydney (1)

ANZAC stands for the Australian and New Zealand Army Corps who fought and died bravely during WWI, and there are many bridges and other monuments to these soldiers in both countries.
This is one of the widest cable-stayed bridges (at 106 ft) I've come across. Also, it appears to be hanging freely from the towers without any kind of bearings or dampers (although I may have missed them).
We'll take another look at this bridge tomorrow.
Australia's Bridges: Anzac Cable-Stayed Bridge (2) in Sydney by Mark Yashinsky is licensed under a Creative Commons Attribution-NonCommercial-NoDerivs 3.0 Unported License.
Wednesday, March 9, 2011
Australia's Bridges: Hay Street Railroad Bridge in Sydney

Greetings from Sydney Australia. This railroad bridge over Hay Street carries trains in and out of Sydney's Central Station. I like the reddish tint of the stone.
Australia's Bridges: Hay Street Bridge in Sydney by Mark Yashinsky is licensed under a Creative Commons Attribution-NonCommercial-NoDerivs 3.0 Unported License.
Tuesday, March 8, 2011
Arizona's Bridges: Glen Canyon Dam Bridge (2)

Arizona's Bridges: Glen Canyon Dam Bridge (2) by Mark Yashinsky is licensed under a Creative Commons Attribution-NonCommercial-NoDerivs 3.0 Unported License.
Monday, March 7, 2011
Arizona's Bridges: Glen Canyon Dam Bridge (1)

I have more ambivalent feelings about this Arizona bridge, not only because it was used to dam the Colorado River, but because I got a $500 ticket just before the bridge for crossing a double line to pass a recreational vehicle.
The Glen Canyon Dam Bridge was built in 1959. It's 1560 ft long and about 700 ft above the river. It looks a little bit like the new Navajo Bridge but with simple steel columns between the arch and the deck. We'll take another look at the bridge tomorrow.
Arizona's Bridges: Glen Canyon Dam Bridge (1) by Mark Yashinsky is licensed under a Creative Commons Attribution-NonCommercial-NoDerivs 3.0 Unported License.
Arizona's Bridges: Navajo Bridge (5)
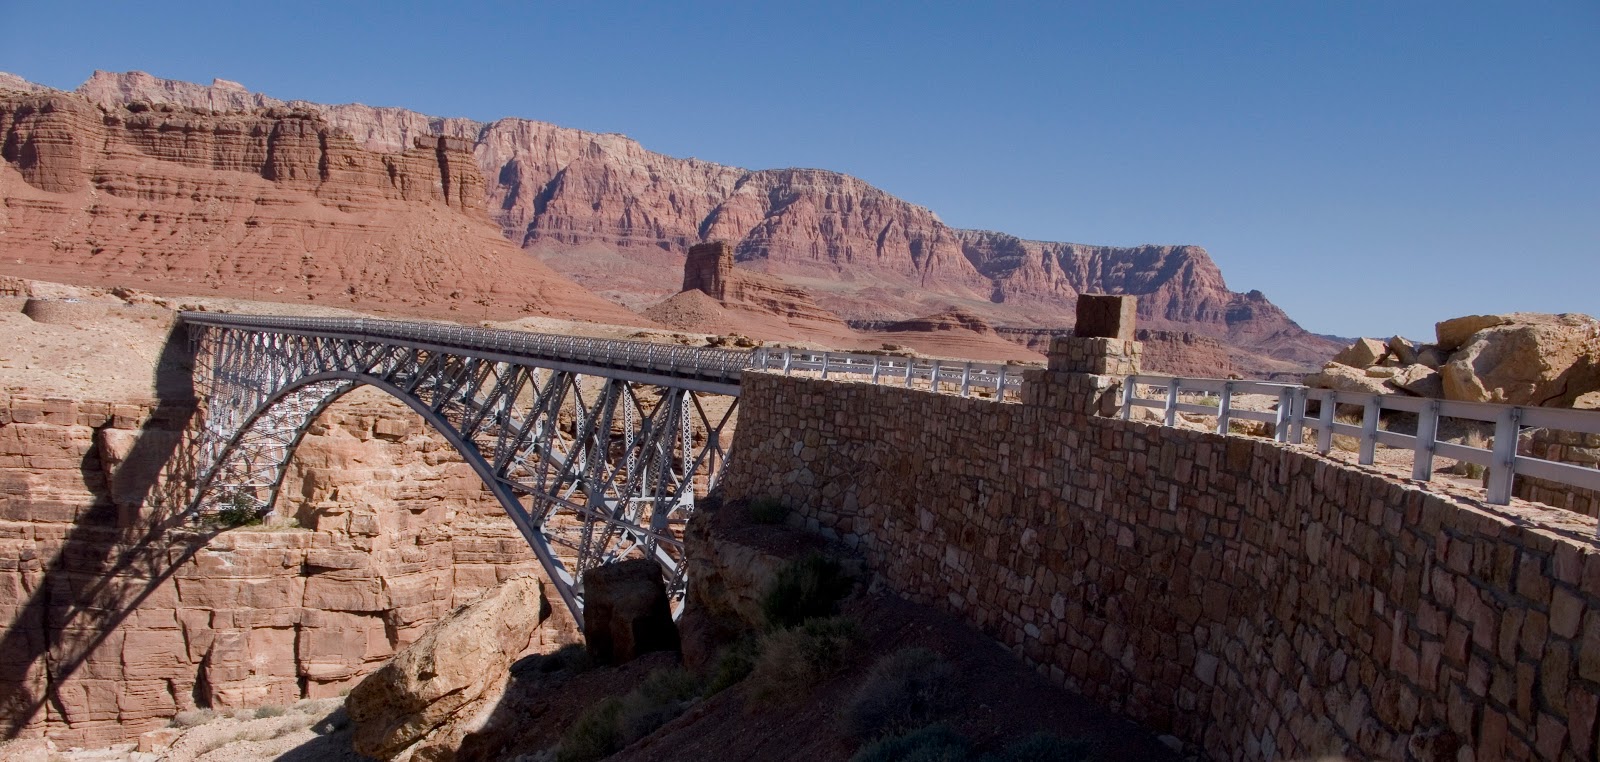
A view of the old Navajo Bridge with a stone retaining wall on the southeast side.
Arizona's Bridges: Navajo Bridges (5) by Mark Yashinsky is licensed under a Creative Commons Attribution-NonCommercial-NoDerivs 3.0 Unported License.
Saturday, March 5, 2011
Arizona's Bridges: Navajo Bridge (4)

Arizona's Bridges: Navajo Bridges (4) by Mark Yashinsky is licensed under a Creative Commons Attribution-NonCommercial-NoDerivs 3.0 Unported License.
Subscribe to:
Posts (Atom)